Online Help
Introducing Hot Virtual Keyboard
Hot Virtual Keyboard makes previous-generation on-screen keyboards look ancient. Type faster with configurable gestures, launch programs, browse the Internet, and run programmable macros with any of the 70 keyboards included with Hot Virtual Keyboard. The new virtual on-screen keyboard employs advanced typing techniques used in modern mobile phones and communicators, including word auto-complete allowing you to choose the right word with a single click after entering just one or two letters.
Users of Tablet PC, UMPC, Panel PC, Car PC and similar touch-screen devices will find Hot Virtual Keyboard indispensable. Use a mouse, touchpad or fingers for on-screen typing. With Hot Virtual Keyboard, you can type faster and more conveniently than by using built-in Windows On-Screen Keyboard. Use gestures for quickly performing repeat operations such as shifting the case of the letters, specify applications to hide Hot Virtual Keyboard from, and set your own hotkeys to launch programs or websites, run macros, and perform operations such as copy and paste.
The new virtual on-screen keyboard replaces Windows built-in Touch Keyboard with a much more advanced alternative. It's just as useful and as compatible as the native application. Supporting all languages and all installed keyboard layouts, Hot Virtual Keyboard is a truly international tool. Supplying over 70 pre-defined keyboard skins, the virtual on-screen keyboard allows you to create, customize and configure a unique new keyboard to your personal liking. Adjust colors and gamma, assign unique sounds to groups of keys, set the shape of the keys, and choose your own background.
Using a virtual on-screen keyboard does not have to be a hassle. Try Hot Virtual Keyboard, and you'll never go back!
How to use Hot Virtual Keyboard
Are you new to Hot Virtual Keyboard? Read Using the on-screen keyboard first!
That topic explains how to use the virtual keyboard.
Do you have any questions? Read FAQ first.
If you have any problems with Hot Virtual Keyboard, please read Frequently Asked Questions.
Using the on-screen keyboard
The on-screen keyboard lets you enter text using a touchscreen, a mouse, or any other pointing device.
Unlike a physical keyboard, the on-screen keyboard changes labels on its keys depending on the current input layout (language), which allows you to type without having a localized keyboard.
The on-screen keyboard also provides additional settings to help you enter text more quickly: Text Suggestions, Gestures, Typing Aid, Show alternate characters or symbols, and more.
The icons of shortcut keys used in Windows and in the current application are displayed on the keys of the on-screen keyboard. If you hover the mouse over a key with an icon, you can see a hint describing the shortcut’s purpose. This way, you can quickly learn keyboard shortcuts, which will help you work much faster and easier.
You can forcibly show or hide the on-screen keyboard by pressing the corresponding keyboard shortcut (by default, Apps), or by selecting the On-Screen Keyboard item in the application’s context menu.
For more details on configuring the appearance and behavior of the on-screen keyboard, see the On-Screen Keyboard section.
Tips and tricks
- You can use the Floating Window or the Floating Icon to quickly show or hide the on-screen keyboard.
- If you right-click a key on the on-screen keyboard, the character will be entered in uppercase.
- If you click a key on the on-screen keyboard with the middle mouse button, the application will emulate a key press in combination with the Ctrl key.
- You can manually create files with shortcut icons for applications used in your everyday work. If you create such a file for an application frequently used in your company and copy it to several workstations, you will considerably increase the efficiency of the employees. For more details, see the Editing shortcut icons section.
- When the on-screen keyboard is used with a touchscreen, the arrow keys work as a D-pad.
See Also
How to install another language and keyboard layout
Keyboard shortcuts settings
Keyboard shortcut (also known as accelerator key, shortcut key, hot key, hotkey, key binding, key combo, etc.) is a combination of keys that you need to press simultaneously to perform a certain action.
Keyboard shortcuts are added, deleted, and edited in the Keyboard Shortcuts Settings window. You can open it in several ways:
1. Click the Hot Virtual Keyboard icon in the system tray.
2. Right-click the Hot Virtual Keyboard icon in the system tray to open the application’s context menu. Then select the Keyboard Shortcuts Settings item in that menu.
3. Press the keyboard shortcut that opens the Keyboard Shortcuts Settings window (by default, Win+CapsLock).
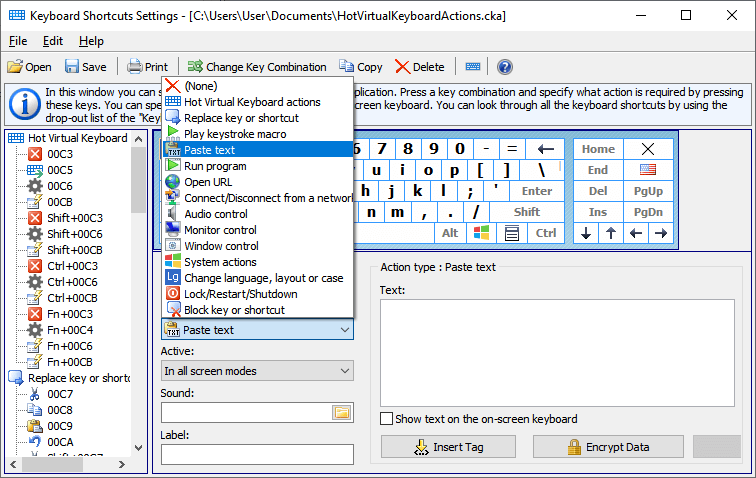
NEXT STEP: Specify the keyboard shortcut to be used. There are two ways to do it:
1. Switch to the Key combination field and press the desired key combination.
2. Use the mouse pointer to select the keys for the combination on the on-screen keyboard.
NEXT STEP: Use the Action field to select the type of the action to be performed when you press the specified shortcut key.
You can use the Active field to specify display modes the specified action should work in. For instance, you can disable the Win keys and enable additional shortcut macros (see Play a keystroke macro section) in full-screen mode. This way, you can apply special settings when playing a computer game.
LAST STEP: Specify advanced parameters for the selected action. See the list of all actions, their parameters and usage examples in the Action types section.
Tips and tricks
- All active keyboard shortcuts are shown on the on-screen keyboard. For more details, see the Using the on-screen keyboard section.
- If you assign a label for an action, this label will be displayed on the on-screen keyboard and in the hint instead of the action description.
- When you are specifying keyboard shortcuts, the left and right control keys (Shift, Ctrl, Alt, or Win) are processed differently. To use only the right Shift, Ctrl, Alt, or Win key in a keyboard shortcut, press the respective right key. To use both right and left keys, press the respective left key.
- To delete an earlier specified keyboard shortcut, select (None) in the Action type field.
- When specifying a keyboard shortcut, you can use almost any keys or key combinations, including NumLock, CapsLock, and Alt+Tab. However, the following keys and key combinations cannot be used: Sleep, WakeUp, Power, F-Lock, and Ctrl+Alt+Del.
- To print the list of keyboard shortcuts, select the Print List item on the File menu.
- If you create several files with different keyboard shortcut configurations, you will be able to switch between them at any time (for instance, to use a separate set of keyboard shortcuts for particular applications). You can specify and use a keyboard shortcut for switching between the files.
- You can add a set of keyboard shortcuts from another file. To do it, select the Add from File... item on the File menu, and then select the file with the keyboard shortcut set.
- You can add a set of standard keyboard shortcuts to your file. To do it, open the Settings dialog box, switch to the Keyboard Shortcuts section, and click the Add... button. You can also remove an existing set of standard keyboard shortcuts from your file by clicking the Remove... button in the same section.
- To use one set of keyboard shortcuts in workgroups, save the file containing this set to a network resource, and configure it to be used on each workstation.
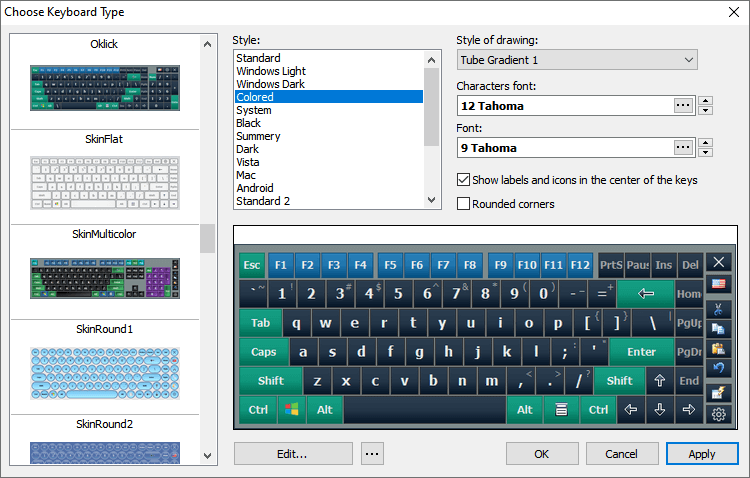
Customizing the keyboard type
You can customize the size of the on-screen keyboard, as well as the arrangement, appearance, and size of its keys.
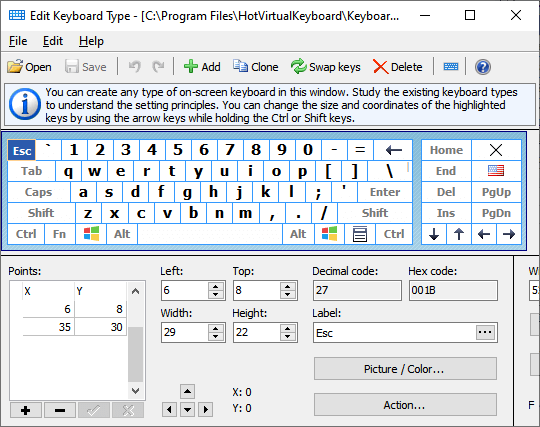
To edit the on-screen keyboard, open the Settings dialog box, select the On-Screen Keyboard item, and then click the Edit... button. By default, the current keyboard type will be opened. To edit another keyboard type, click the File menu, and then click Open.
When editing the keyboard, you can use two types of virtual keys:
- Square keys are used by default. Specify only two points for them: the upper-left corner and the lower-right corner. You can use the Width and Height fields for such keys.
- Keys consisting of lines can take any shape. To configure them, use the Points table to specify all points that should be joined by lines, one by one. The last line will be automatically drawn between the first and last points. If necessary, you can use lines to draw a circle or oval. Look at how the Enter key is specified on the standard keyboard. Actually, it is one key, though displayed as two keys. The point [-1, -1] means that the points of one key end and the points of the next key start.
You can specify all parameters for the keys via the fields in the lower part of the window.
When editing the keyboard, you can use the following features:
- Use the mouse pointer to select several keys at once by holding down the Shift key.
- Use the arrow keys to resize one or more selected keys by holding down the Shift key.
- Use the arrow keys to change the position of one or more selected keys by holding down the Ctrl key.
- Change any label. The new label will be displayed on the keys instead of the standard label or character. For instance, you can assign the “Customers” label to the F2 key. You can also change the font of the text or use special characters.
Assigning an image to any key of the on-screen keyboard
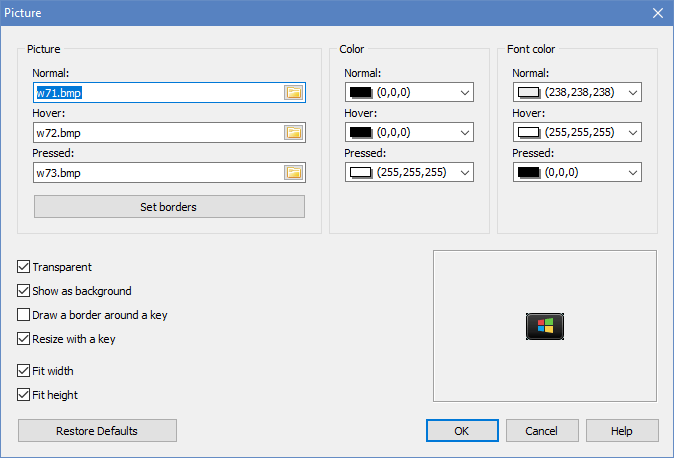
Picture (Normal, Hover, Pressed)
You can assign an image to each key state, or use the same image for all key states.
- Normal – The key in its normal state
- Hover – The highlighted key, when the mouse pointer hovers over it
- Pressed – The key when pressed
Set borders
You can set borders for the picture on the key. When the application resizes the picture, the borders will not change.
Color (Normal, Hover, Pressed)
A key fill color, which is used only if the Picture setting is not used.
Font color (Normal, Hover, Pressed)
You can specify the font to be used for each key state. Font colors can be set even if no images are assigned to keys in the previous fields. If you keep the default setting, the application will use the color values from the theme’s settings.
Transparent
To let the key behind the image show through the image background, select the Transparent check box. To make the image background opaque, unselect the Transparent check box.
Note: The Transparent property works only for images in the Bitmap format.
Show as background
If this option is on, key labels and hotkey icons will be rendered on top of the key image. Otherwise labels and icons will not be shown on the key.
Draw a border around a key
This option comes in handy if the image completely replaces the default style of the key. For example, see the SkinMulticolor keyboard.
Resize with a key
If this option is on, the image will be resized when the key size changes.
Fit width, Fit height
If this option is on, the width and/or height of the image will always be equal to the width and height of the key it was assigned to, respectively.
Additional keyboard settings
If you select this keyboard, Hot Virtual Keyboard will change the specified settings:
- Change the Fit width option regardless of the application’s settings
- Change the Lock aspect ratio option regardless of the application’s settings
- Always move the keyboard to the lower edge of the screen
- Always display labels and icons in the center of keys
- Always transparent keyboard background
- Fixed font size for all key labels (if empty, use the one from the application’s settings)
- Dividing points – This option is used when the keyboard size changes. The keyboard splits along the specified points, and the keys slide in opposite directions.
States:
![]() - Don’t change
- Don’t change
![]() - Turn off
- Turn off
![]() - Turn on
- Turn on
Tips and tricks
- You can use the image or photo of a keyboard to edit a new on-screen keyboard according to it. To do it, select the Add Background command on the Edit menu and open the necessary image file. After configuring the keyboard, you can remove the image by selecting the Clear Background command on the Edit menu.
- It might be easier to create a new keyboard if you use an existing one as a basis. To do it, select the keyboard that looks mostly like yours, and save it under a different name by selecting the Save As... command on the File menu.
- Right-click the on-screen keyboard while editing it to add another point with the cursor coordinates to the currently edited key.
- When configuring complicated keys, it might be easier to use a txt file containing all of the information about the keyboard. Keyboard files are stored in the Keyboards subfolder.
- All modified keyboard txt files are stored in the Application Data folder. You can see the full path in the caption of the Edit Keyboard Type window (for example, “C:\Documents and Settings\UserName\Application Data\ComfortSoftware\HotVirtualKeyboard\Keyboards\”). You can move files from this folder to the Keyboards subfolder of the application installation folder.
- To delete an existing keyboard type, delete the file with its description from the Keyboards subfolder.
- To create a few keys with the same action assigned to them, add the point [-1, -1] to the points list. This special point means that the points of one key end and the points of the next key start. Some on-screen keyboards have two space bars or two Enter keys created using this method.
See Also
How to install another language and keyboard layout
Text tags
These types of macros are used if you have configured plain text templates or the Paste Text action.
<KEY shortcut>
Press the key combination. Keystrokes will be emulated inside the text (see the key identifier list). Use + (the plus sign) to specify a keyboard combination. You can specify a key code in the hexadecimal format by using $ (the dollar sign). For instance, $20 is Space, and $1B is Escape. Sample keyboard combinations:
- <KEY WIN+R>regedit<KEY Enter> – Start the registry editor.
- Login<KEY TAB>password<KEY ENTER> – Enter the login and the password.
<INPUT>
This tag adds the ability to enter text from the keyboard that will be inserted into the text template.
<SOMEOF>...</SOMEOF>
Select random text from the lists enclosed in the <CS> and </CS> tags. You can nest these tags. Simple examples:
- <SOMEOF><CS>1</CS><CS>2</CS></SOMEOF> – Inserts “1” or “2”.
- <SOMEOF><CS>hi<SOMEOF><CS>1</CS><CS>2</CS></SOMEOF></CS><CS>bye<SOMEOF><CS>1</CS><CS>2</CS></SOMEOF></CS></SOMEOF> – Inserts “hi1”, “hi2”, “bye1”, or “bye2”.
<POPUP>...</POPUP>
Show popup menu. Select text from the lists enclosed in the <CS> and </CS> tags. You can nest these tags inside one another. To name a <CS> entry, type the name after <CS, separated by a space — names may contain spaces. Example: <POPUP><CS Name1>Hi</CS><CS Name 2>Hello</CS></POPUP> — inserts "Hi" or "Hello".
<FILE filename>
Inserts text from the specified file (if it exists) into the specified position.
<SELECTION>
Inserts the text currently selected in the active application.
<CLIPBOARD>
Inserts the text from the clipboard.
<SCRIPT>
This tag allows you to perform various functions using JavaScript, for example:
<SCRIPT>
<FILE>Common.js</FILE>
<FUNCTION>DoublingSlashes</FUNCTION>
<PARAM><SELECTION></PARAM>
</SCRIPT>
<DATETIME format>
Inserts date and time in the specified format (see the format list). You can get the date shifted by a certain number of days, weeks, months. Use the following format:
+d, -d, +d1, -d1, +d2, -d2, +d3, -d3, etc. - Shift by one day, two days, three days, and so on. (y - year, w - week, m - month, d - day, h - hour, n - minute)
Note: You can specify the position of the text cursor after the text is pasted by placing | (the pipe character) there.
Editing shortcut icons
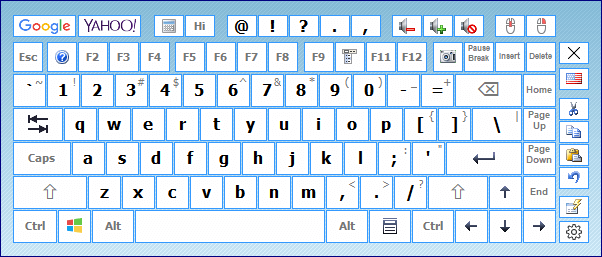
Shortcut icons are displayed on the on-screen keyboard. A separate set of shortcut icons is displayed for each application.
Since applications use different mechanisms for storing shortcut icons, it is impossible to detect them automatically. So the Comfort Software Group uses its own sets of shortcut icons for each application. You can configure shortcut icons for any application (or Windows).
To edit shortcut icons, open the Settings dialog box, select the Shortcut Icons item, and click the Edit shortcut icons button.
By default, the Win* icon file is edited. To edit a different icon file, click the File menu, and then click Open.
Start the application you want to create icons for and select the name of its executable file in the File name drop-down menu. After that, the Main window class name and Application name fields will be filled in automatically.
The File name and Main window class name fields are used to determine which application is active. You can specify both fields or only one of them.
The Application name field is used for information about a specific application. Enter your details (for example, “Awesome App by John Doe (john@doe.com)”).
To add a new icon, specify the keyboard shortcut in the Key combination field, or select it on the on-screen keyboard.
After that, you can add the icon in the following ways: load it from a file, capture the screen, or paste an image from the clipboard. If you add an icon by capturing the screen, fill the entire area you don’t need with the Fuchsia color, and select that color in the Transparent color field. To see if the icon is good, try selecting another style (for instance, black).
Finally, you can specify a hint to be displayed when you hover the mouse pointer over the key with the icon on the on-screen keyboard. You can use only one language, preferably English.
Note: All files with sets of shortcut icons are stored in the Icons subfolder.
Settings
When developing Hot Virtual Keyboard, we tried to keep the number of optional settings to a minimum, leaving only those that are truly necessary.
To open the Settings dialog box, right-click the Hot Virtual Keyboard icon in the system tray and select the All Settings item in the context menu.
System
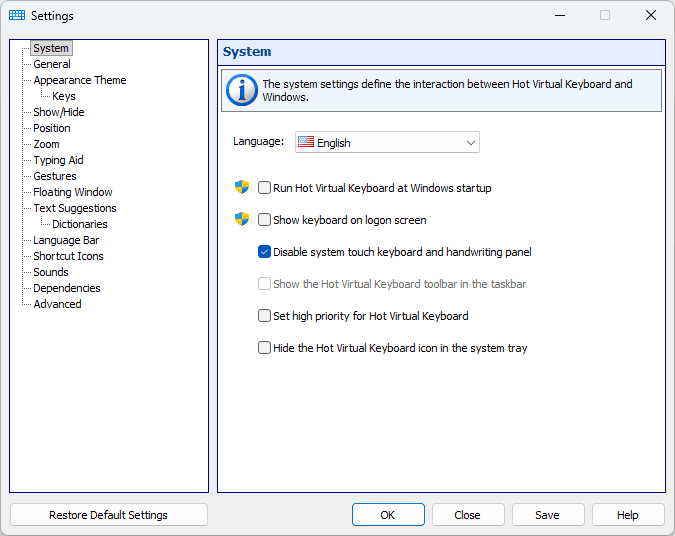
The system settings define the interaction between Hot Virtual Keyboard and Windows.
Language
The language of the Hot Virtual Keyboard user interface. To change the language of the on-screen keyboard, install another language or keyboard layout in your system.
Run Hot Virtual Keyboard at Windows startup
If you check this checkbox, Hot Virtual Keyboard will be automatically launched when the system is started.
Show keyboard on logon screen
If you check this checkbox, the on-screen keyboard will be shown before any user logs into the system. A separate instance of the application, possibly with different settings, will be launched for that on-screen keyboard (see the FAQ for developers section).
Disable system touch keyboard and handwriting panel
You can turn off the system Touch Keyboard that appears when you use a touchscreen. Note: Windows 7 and above.
Show the Hot Virtual Keyboard toolbar in the taskbar
Checking this checkbox will add the application’s toolbar with one button onto the taskbar. You can use this button to launch the on-screen keyboard.
Note: Not supported on Windows 11.
Tip. You can place a one-click show/hide button for the on-screen keyboard on the Windows taskbar. Open the program’s installation folder, find the bundled utility ToggleKeyboard.exe, and pin it to the taskbar (right-click the file or its Start-menu shortcut "Show or hide the on-screen keyboard" and choose Pin to taskbar). Clicking the pinned icon afterwards will show the on-screen keyboard if it is hidden, or hide it if it is currently visible — without opening the main program window.
Set high priority for Hot Virtual Keyboard
Check this checkbox if any features of Hot Virtual Keyboard are unstable on your system.
Hide the Hot Virtual Keyboard icon in the system tray
If this checkbox is checked, the application’s icon will not be shown in the system tray.
Add to the Windows context menu
Checking this checkbox will add the Assign Keyboard Shortcut item to the Windows context menu. You can select that item to assign shortcut keys for quick access to applications, documents, and other files.
![]()
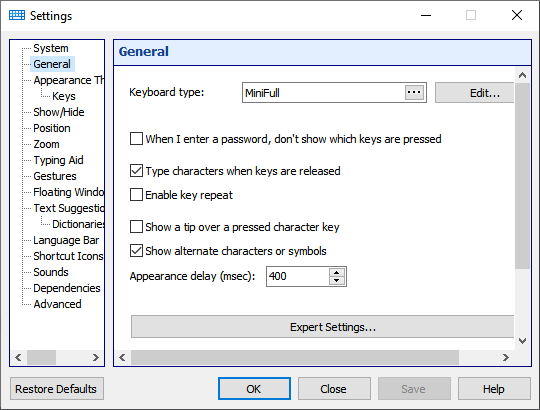
General
The application displays a virtual keyboard on the computer screen, so that you can type using a pointing device or touchscreen.
Keyboard type
You can select a keyboard type. Each keyboard can have its own arrangement of keys. A special style has been defined for some keyboards. To edit any keyboard, select it and click the Edit... button. The keyboard layout changes depending on the current input language. You don’t have to create your own keyboard for each language.
When I enter a password don’t show which keys are tapped
If this checkbox is checked, key pressing will not be shown on the on-screen keyboard when the focus is on a password entry field. The Text Suggestions window also will not be shown.
Type characters when keys are released
If this checkbox is checked, characters will be typed when you raise your finger from the surface of a touchscreen or release the mouse button. Otherwise characters will be typed as you touch or click a key, just like with a regular keyboard. This option is especially useful in combination with the settings below.
Note: This feature doesn't work if the Enable key repeat option is on.
Enable key repeat
When a key is pressed and held, the keyboard types and continues to type the appropriate symbol at regular intervals until the key is released. This is the common behavior for a hardware keyboard. So you can use the on-screen keyboard for playing games on your mobile PC with a touch-screen.
If you turn it on, the Gestures and Type characters when keys are released features will not work.
Show a tip over a pressed character key
If this checkbox is checked, pressing a key will cause a small window with an enlarged version of the corresponding character to pop up. This option is especially useful in combination with the previous option.
Show alternate characters or symbols
With this option on, Hot Virtual Keyboard will show alternate characters when you press and hold a key. The selected character will be entered when you release the key.
You can edit the list of alternate characters by editing the AlternateSymbols.txt file in the Data subfolder.
Note: This feature doesn't work if the Enable key repeat option is on.
Appearance delay (msec)
The delay between pressing a key and the appearance of the list of alternate characters.
Expert Settings
Show while holding down the key
Check this checkbox to show the keyboard when you hold down one of the selected keys: Shift, Ctrl, Alt, or Win.
Appearance delay (msec)
The delay between pressing a control key and the appearance of the on-screen keyboard.
Repeat delay (msec)
The amount of time that elapses before a character repeats when you hold down a key.
Repeat rate (characters per second)
The speed at which a character is repeated when you hold down a key.
Mouse pointer
There are three mouse pointer types that you can use: Standard (Arrow), Hand, or Invisible.
Show key characters in the UPPER CASE
If this option is on, key characters will be displayed in uppercase regardless of the state of the Shift and CapsLock keys.
Appearance Theme
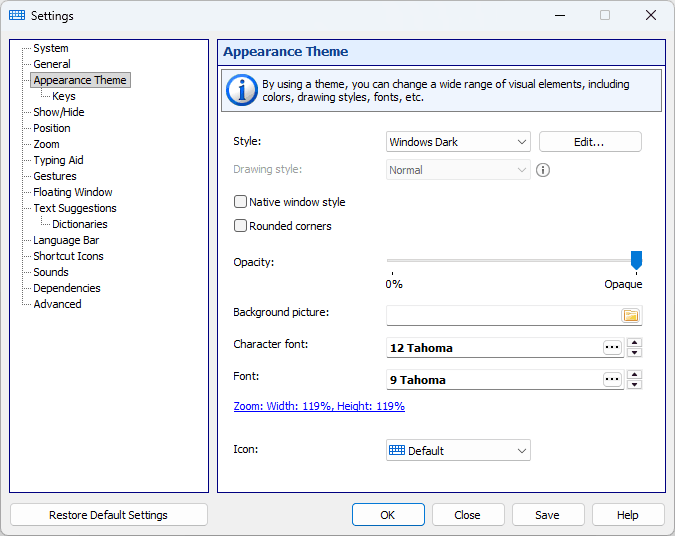
By using a theme, you can change a wide range of visual elements, including colors, drawing styles, fonts, etc.
Style
A color scheme.
To edit any color scheme, select it and click the Edit... button (a new Custom scheme will be created). To edit a color, click the object and choose a color. You can assign an image to each key state, or use the same image for all key states.
Key states:
- Normal – The key in its normal state
- Hover – The highlighted key, when the mouse pointer hovers over it
- Pressed – The key when pressed
Drawing style
This style can be Normal, Gradient, or Tube Gradient.
Native window style
Checking this checkbox will instruct the application to use the native Windows style.
Rounded corners
Check this checkbox to make the application use the rounded style. If you do it, the rounding of windows’ corners and buttons will be turned on.
Overall opacity
You can adjust the opacity of the on-screen keyboard.
Background picture
You can select an image file (for example, a photo) to be used for the background. To remove the background image, simply clear the filename in the text field.
Character font
The font for characters displayed on the on-screen keyboard.
Font
The font for labels displayed on the on-screen keyboard.
Icon
The icon for the on-screen keyboard in the system tray, the toolbar, the floating window, and floating icon.
Keys
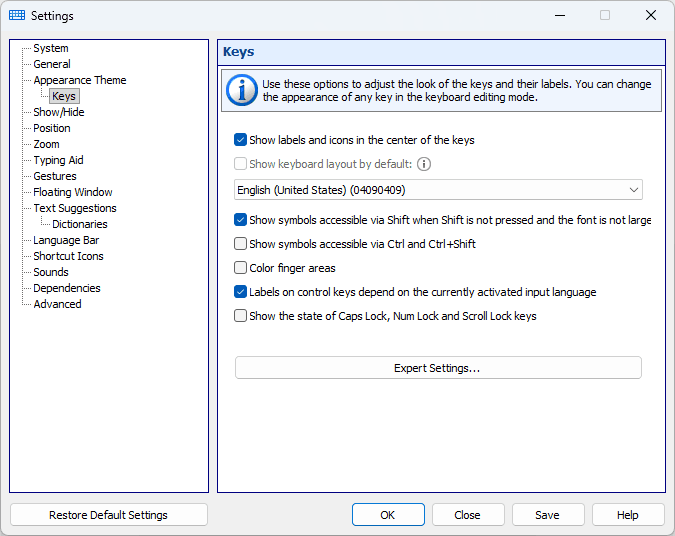
Use these settings to adjust the look of keys and their labels. You can change the appearance of any key in the keyboard editing mode.
Show labels and icons in the center of keys
This option comes in handy if you use only one input language.
Show keyboard layout by default
The layout or language that is used to display key names in the upper-left corner.
Show symbols accessible via Shift when Shift is not pressed and font is not large
If the key size and font allow, all numerical keys will contain characters that are typed in combination with the Shift key.
Show symbols accessible via Ctrl and Shift+Ctrl
This option lets you display the characters that become available when you press Ctrl or Ctrl+Shift. As a rule, such key combinations are not used for text entry.
Color finger areas
You can highlight keys to learn touch typing. The keys will be highlighted in a different color for each finger.
Labels on system keys depend on the currently selected input language
You can change the labels displayed on these keys: Backspace, Tab, Enter, Shift, Ctrl, Alt, AltGr, Pause, Esc, PgUp, PgDn, End, Home, Arrows, PrtScr, Ins, Del, Apps, Win, Caps Lock, Num Lock, and Scroll Lock.
Show the state of Caps Lock, Num Lock and Scroll Lock keys
This option lets you display these keys as pressed if the respective mode is on (that is, if the respective indicator is lit on the physical keyboard).
Show/Hide
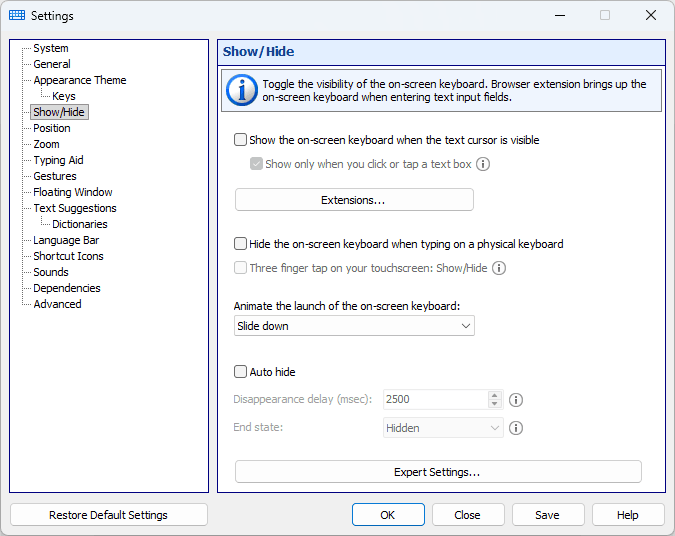
Show the on-screen keyboard when the text cursor is visible
If this checkbox is checked, the on-screen keyboard will appear when the text cursor is placed in a text field. Some applications draw the text cursor in their own way and do not provide information about its state. In this case, you can open the keyboard by pressing a hotkey or clicking the keyboard icon. You can also install a Browser Extension.
Show only when you click or tap a text box
If this checkbox is checked, the on-screen keyboard will appear when you click or tap a text box. If you activated the application and the text cursor is visible, the keyboard will be hidden until you click a text box.
Extensions
You can install a browser extension to make the on-screen keyboard appear when the cursor is placed inside a text field. The extension will add keyboard-related information to the browser caption, and the application will monitor the caption for changes.
Hide the on-screen keyboard when typing on a physical keyboard
If you check this checkbox, the on-screen keyboard will disappear when you press a key on a physical keyboard; the on-screen keyboard will appear again when you touch the touchscreen, or call the on-screen keyboard by pressing a hotkey or clicking the keyboard icon.
This setting also hides the keyboard when you attach a Cover Keyboard.
Three finger tap on your touchscreen: Show/Hide
A three-finger tap on your touchscreen will toggle the visibility of the on-screen keyboard. This feature doesn't work in some applications. Note: Windows 8 and above.
Animate the launch of the on-screen keyboard
When the keyboard is started, it will appear on the screen by sliding up or down from under the specified screen border. When the keyboard is closed, it will slide under the specified border.
Auto hide
This option lets you hide the keyboard after the time specified in the Disappearance delay field expires.
Disappearance delay (msec)
The delay between the last pressing of any key and the disappearance of the on-screen keyboard.
End state
The on-screen keyboard can be transparent but not hidden totally. For example, you can set 5% opacity as the end state.
Position
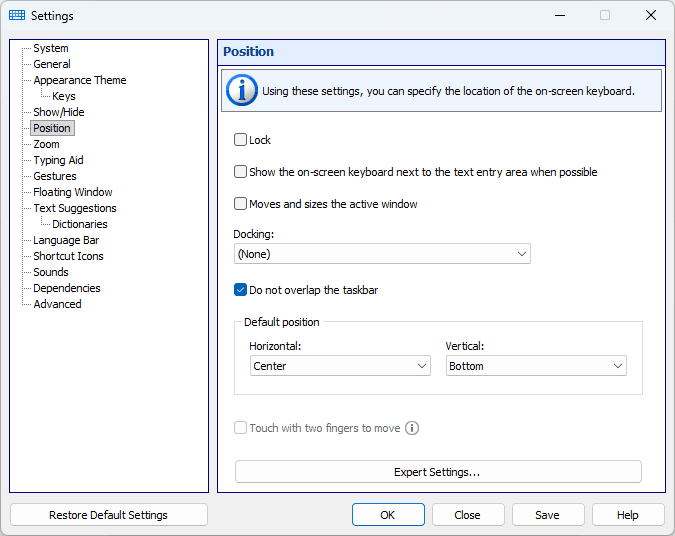
Using these settings, you can specify the location of the on-screen keyboard.
Lock
Prevents the keyboard from moving.
Show the on-screen keyboard next to the text entry area when possible
Some applications draw the text cursor in their own way and do not provide information about its position (these are Firefox, OpenOffice, CorelDRAW, etc.). In this case, the keyboard will be shown at the bottom of the screen.
Note: This feature doesn't work when you set the Docking setting.
Moves and sizes the active window
If the active window sits under the on-screen keyboard, Hot Virtual Keyboard resizes and moves it so it stays in view. Unlike the Docking setting, it only resizes and moves the active window, and it cannot resize a web browser running in kiosk mode.
Docking
You can dock the keyboard at the top or bottom of the screen. If you dock the keyboard, the available desktop space will be reduced. Other applications’ windows and desktop icons will be rearranged to adjust to the change.
Do not overlap the taskbar
The taskbar is taken into account when moving the keyboard to the edge of the screen if this setting is enabled.
Default position
When the on-screen keyboard appears, it will be automatically moved to the specified position (even if it had been moved elsewhere). If the user moves the keyboard to any location on the screen, it will remain at that location until it disappears.
You can change this setting for any keyboard in the Edit Keyboard Type window. So your keyboards will have different positions on the screen when you switch between them.
The keyboard position changes even if the Lock setting is set.
Touch with two fingers to move
To move the on-screen keyboard, touch it with two fingers, and move them in the same direction. Note: Windows 7 and above.
Zoom
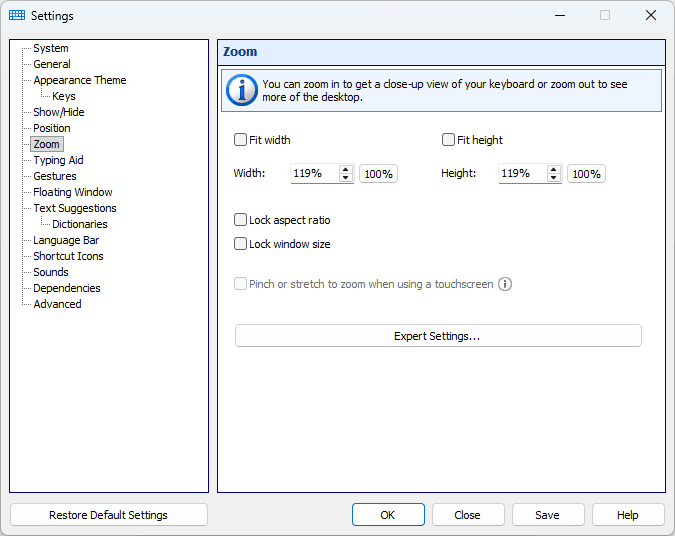
You can zoom in to get a close-up view of your keyboard, or zoom out to see more of the desktop. This feature lets you change the keyboard size without editing it.
Fit width
You can automatically scale the on-screen keyboard to match the screen width. This feature is useful if you frequently switch the screen between the portrait and landscape modes.
Width
The keyboard width scaling ratio. You can resize the keyboard window in the usual manner, by dragging its edge with the mouse.
Fit height
You can automatically scale the on-screen keyboard to match the screen height. If this option is used together with Fit width, the keyboard will fit the screen size.
Height
The keyboard height scaling ratio.
Lock aspect ratio
If this ratio is locked, the keyboard’s width will be scaled in the same proportion as its height (and vice versa, the height will be scaled in the same proportion as the width).
Lock window size
You can prevent the keyboard from resizing.
Pinch or stretch to zoom when using a touchscreen
To zoom in or out, touch the on-screen keyboard with two fingers and then move the fingers toward each other (pinch) or away from each other (stretch). Note: Windows 7 and above.
Typing Aid
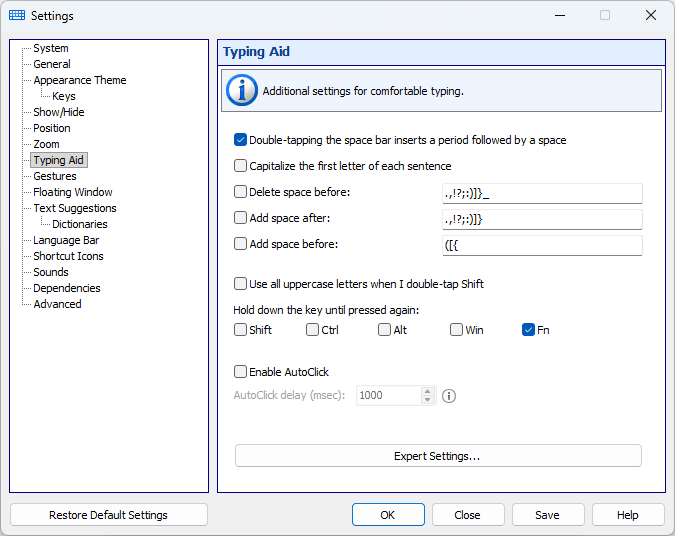
Additional features for comfortable typing on the on-screen keyboard.
Double-tapping the space bar inserts a period followed by a space
You can insert a period followed by a space by pressing the space bar twice.
Capitalize the first letter of each sentence
If one of the specified characters is entered, the Shift key will be pressed automatically.
Delete a space before
If any of the characters on the list is entered and there are any spaces before that character, the spaces will be removed.
Add a space after
If any of the characters on the list is entered, a space will be added after that character.
Add a space before
If any of the characters on the list is entered and there is no space before that character, a space will be added before it.
Use all uppercase letters when I double-tap Shift
Double-tapping Shift on the on-screen keyboard makes it stay down. Tap Shift again to release it.
Hold down Shift, Ctrl, Alt or Win until pressed again
When you press one of these modifier keys, it stays down until you press it again.
Enable AutoClick
If you hover the mouse over a key, it will be pressed automatically with the specified interval between key presses. This feature may be useful for persons with certain disabilities.
AutoClick delay (msec)
The time that passes before a mouse click is done at the mouse pointer’s current position.
Gestures
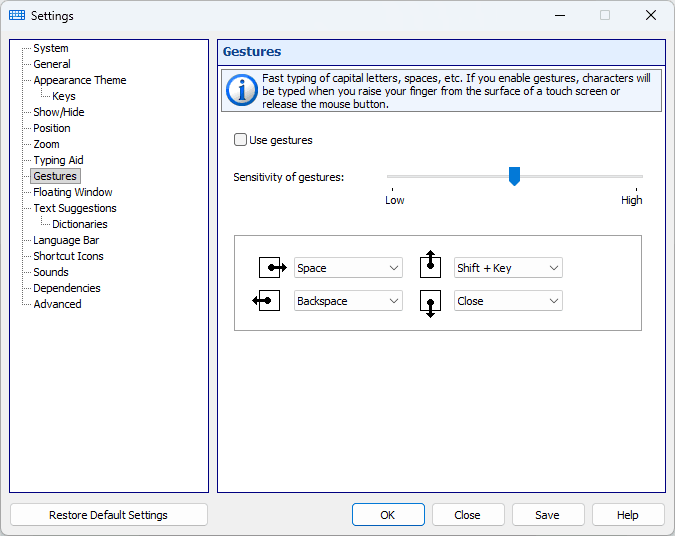
Gestures support (to quickly enter capital letters, spaces, etc.) with adjustable sensitivity:
If you check the Use gestures checkbox, characters will be entered when you raise your finger from the surface of a touchscreen or release the mouse button. Otherwise characters will be entered as you type, just like when you use a regular keyboard.
You can use a mouse or your fingers to perform a gesture:
- Touchscreen: Touch the screen with one finger and move it a short distance.
- Mouse: Mouse gestures work by holding the left mouse button, moving the mouse in a certain direction, then releasing the button.
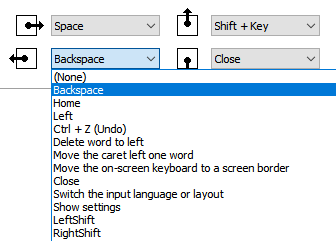
You can modify actions for each swipe type, or disable only some of them by selecting the (None) item.
Note: This feature doesn't work if the Enable key repeat option is on.
You can specify gestures for any of the following actions:
- Press any key
- Press a key with the Shift key
- Delete word to left
- Delete word to right
- Ctrl+Home shortcut
- Ctrl+End shortcut
- Ctrl+Z shortcut (Undo)
- Move the on-screen keyboard to a screen border
- Close the on-screen keyboard
- Text Suggestions on/off
- Move the caret left one word
- Move the caret right one word
- Switch the input language or layout
- Show settings
Floating Window
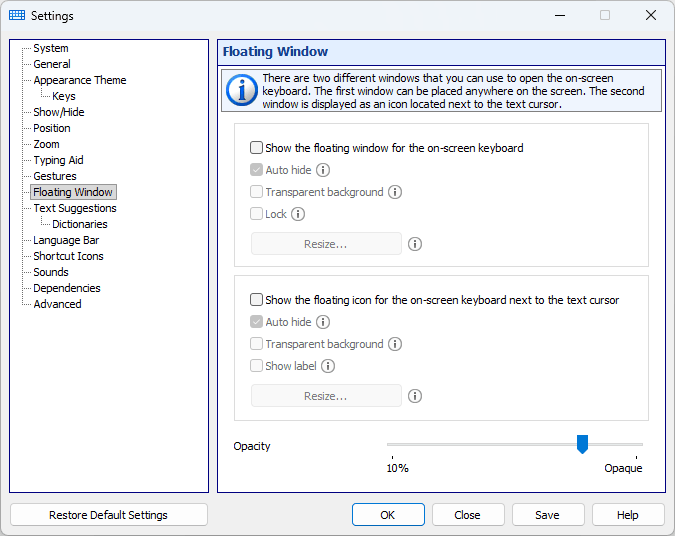
There are two different windows that you can use to open the on-screen keyboard.
The first window, which can be placed anywhere on the screen, allows you to show or hide the on-screen keyboard.
The second window is displayed as an icon located next to the text cursor. If there is no text cursor on the screen, this window will not be shown.
You can resize any of these windows, adjust their transparency, or make them automatically disappear when the keyboard is displayed on the screen.
Auto hide
You can hide these windows when the on-screen keyboard is visible, and show them when the keyboard is hidden.
Transparent background
Show icon and label only.
Show the floating icon for the on-screen keyboard next to the text cursor
You can make a floating icon appear automatically when you tap a screen location where you want to insert your text. To open the on-screen keyboard, tap the floating icon.
Some applications draw the text cursor in their own way and do not provide information about its position. (These are Firefox, Google Chrome, OpenOffice, CorelDRAW, etc.) In this case, the floating icon will not be shown.
Note: You can change the settings of the floating window via its context menu.
Text Suggestions
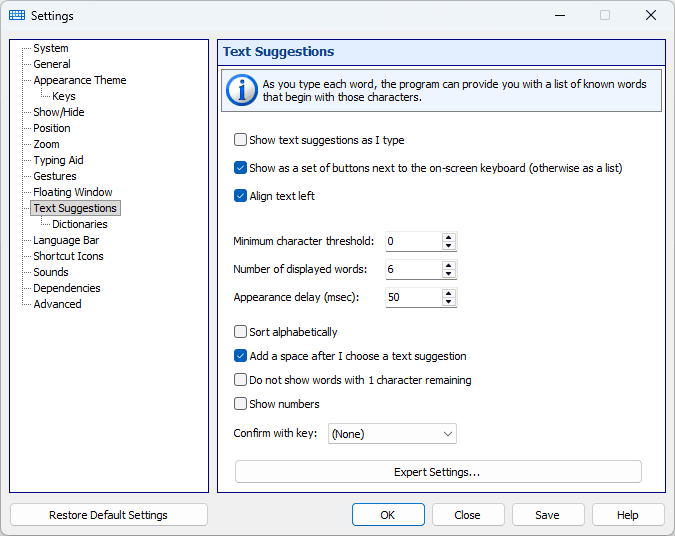
As soon as you have typed a sufficient number of valid characters to equal or exceed the Minimum Character Threshold, the word list will be searched for all known words beginning with those characters. If any matching words are found, the Text Suggestions window will appear with those words; otherwise the window will not be displayed.
If you select any of the suggested words, it will be inserted into the text.
The order of words in the list depends on the statistics accumulated by Hot Virtual Keyboard. The application initially has predefined data on word frequency and word order for the most popular languages. These data are stored in the Common subfolder. When you type any text, Hot Virtual Keyboard memorizes the words that you use, so that later it can place the most frequently used ones at the beginning of the list. Which words are suggested also depends on the previously typed text.
Any new words, which are not available in the installed dictionaries, are saved to the “custom.dic” file. To edit that file, select the file in the list, and then click the Edit... button. When you finish editing the file, click the Read/Refresh word list button.
The word usage statistics are kept separately from other data. To clear the statistics, click the Reset Statistics button.
Installing Dictionaries
The Text Suggestions feature uses files with the “dic” extension (for example, “en.dic”). These files are stored in the Data directory folder. To download a file for your language, click the Download... button.
You can also create your own file with a word list. The file can contain any words or numerical values.
Show as a set of buttons next to the on-screen keyboard
With this option turned on, when the on-screen keyboard is visible, the suggested words are displayed as a row of large buttons docked next to the on-screen keyboard (typically just above it). Otherwise, words are displayed as a vertical list above the on-screen keyboard.
In the grid mode, the number of suggestion buttons that actually fit on screen depends on the length of the suggested words and on the width of the on-screen keyboard: each button is sized to display the longest word in the current list. With long words, only a few buttons fit — sometimes as few as three or even two. With short words, more buttons fit, up to the value set in Number of displayed words. As a result, the visible suggestions may be fewer than the configured maximum.
In this mode, the Auto hide and Show, hide and move with the on-screen keyboard options are implicitly turned on (and therefore hidden in the settings), while the Align text left option becomes available and lets you choose between left-aligned and centered text on the buttons.
Note: Some keyboard shortcuts within the suggestions window — such as navigating with the arrow keys or removing a word from the custom dictionary with Delete — work only when this option is turned off (i.e. when the words are shown as a vertical list).
Align text left
If this check box is checked, the words in the "Text suggestions" window are aligned to the left, otherwise they are centered.
Auto hide
With this option turned on, the Text Suggestions window will be automatically hidden if no matching words have been found. Otherwise you can resize the Text Suggestions window or move it anywhere on the screen.
Show, hide and move with the on-screen keyboard
Checking this checkbox will make the word list behave like part of the on-screen keyboard. Otherwise the word list will be displayed next to the text cursor.
Minimum character threshold
This value defines how many characters of a word you need to type before the Text Suggestions window appears.
Number of displayed words
This value defines how many words will be displayed in the Text Suggestions window.
Appearance delay (msec)
The delay between the typing of valid characters and the appearance of the Text Suggestions window.
Add a space after I choose a text suggestion
The application can automatically type a space after you use word completion. This option is very handy as you won’t have to press the space bar after each word. When you don’t want to add a space automatically, right-click on the word.
Do not show words with 1 character remaining
If this checkbox is checked, nearly finished words will not be shown.
Show numbers
You can display shortcuts on the left side of the Text Suggestions window. This option lets you paste a word by using a numeric key.
Confirm with key
If words are displayed as a vertical list, you can select a word using the arrow keys, and then use the specified key to paste the selected word. If words are arranged in a horizontal line, the first (leftmost) word will be inserted.
Dictionaries
Learn new words
If this checkbox is checked, commonly used words will be saved to the “custom.dic” file.
Note: The words that you enter are saved in the UTF-8 format.
Confirmation of the addition of words to the custom dictionary
With this option on, a confirmation window will be displayed for adding a new word to the “custom.dic” file.
Disappearance delay (msec)
When this time expires, the confirmation window for adding a new word will disappear.
Confirm with key
You can press this key to confirm the adding of a new word to the dictionary.
Data directory
The folder containing dictionaries and user statistics.
Dictionaries
The dictionaries are ASCII files that can be edited directly like any other plain text files.
Read/Refresh word list
Click this button after editing a dictionary.
Reset Statistics
This button clears the user statistics. If the Show text suggestions as I type option is on, the statistics will be collected at all times. The statistics cannot be viewed or edited by the user, but only cleared.
Tips and tricks
- To remove a word directly from the custom dictionary, highlight it in the word list and press the Delete key. For this method to work, the Show as a set of buttons next to the on-screen keyboard option must be turned off.
- To disable common statistics for different languages, delete the files from the Common subfolder.
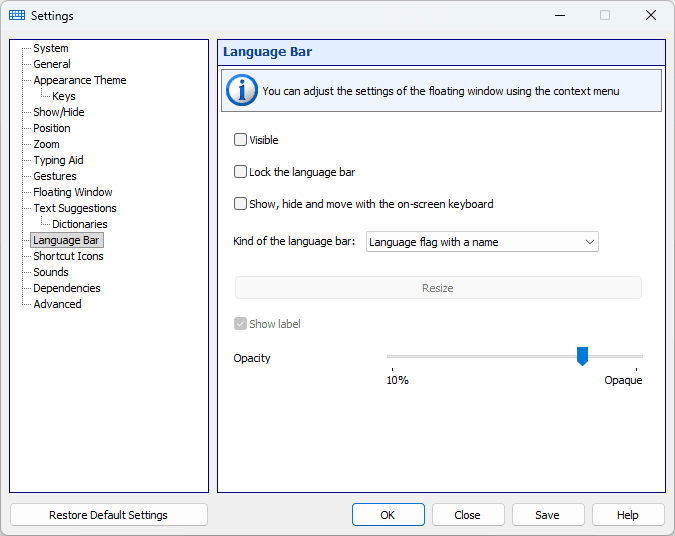
Language Bar
![]()
Visible
If this checkbox is checked, the language bar will be shown.
Lock the language bar
You can prevent the language bar from moving.
Show, hide and move with the on-screen keyboard
Checking this checkbox will make the language bar behave like part of the on-screen keyboard.
Language bar style
- Language flag
- Language flag with a name
- Vertical list of flags
- Horizontal list of flags
- List of flags with names
- Custom
Show label
You can display the “Switch the input language or layout” label next to the language flag in the custom view. The size of the flag depends on the size of the language bar: 16x16 or 32x32 pixels.
Opacity
You can adjust the transparency of the inactive language bar.
Note: You can change the settings of the Language bar via its context menu.
Shortcut Icons
![]()
Application shortcut icons shown on the on-screen keyboard can help you find the necessary shortcut.
Show Windows icons, Show active application icons, Show Hot Virtual Keyboard icons
These settings let you display the respective icons on the on-screen keyboard.
Show hints
You can show hints on the keyboard.
Show information about the availability of application shortcuts
If you check this checkbox, special marks will be shown in the lower-left corners of the keys on the on-screen keyboard. These marks indicate the availability of key combinations with control keys:
- Green – with Ctrl
- Yellow – with Ctrl+Shift
- Blue – with Alt
- Red – with Alt+Shift
See Also
Sounds
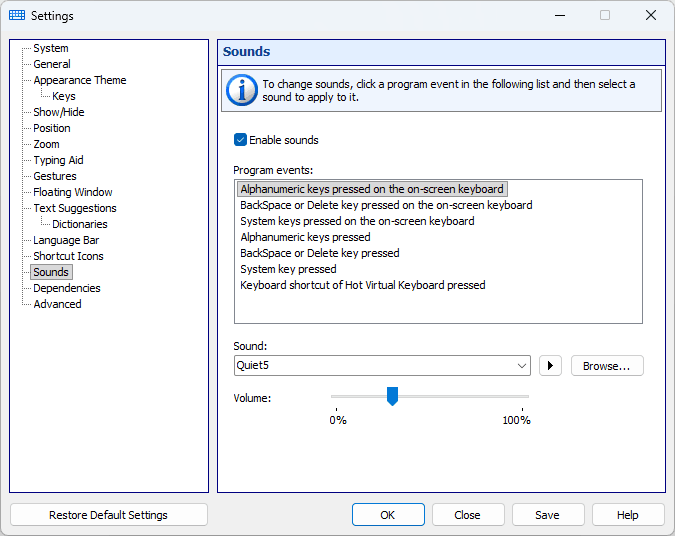
You can configure short sounds for different events, such as pressing a key on the on-screen keyboard.
By default, sounds are turned on. You can turn them off via the application’s context menu.
You can adjust the volume for the sounds. The application will apply that volume to all its sounds.
To select your own sound, click the Browse... button. You can use only WAV files.
Dependencies
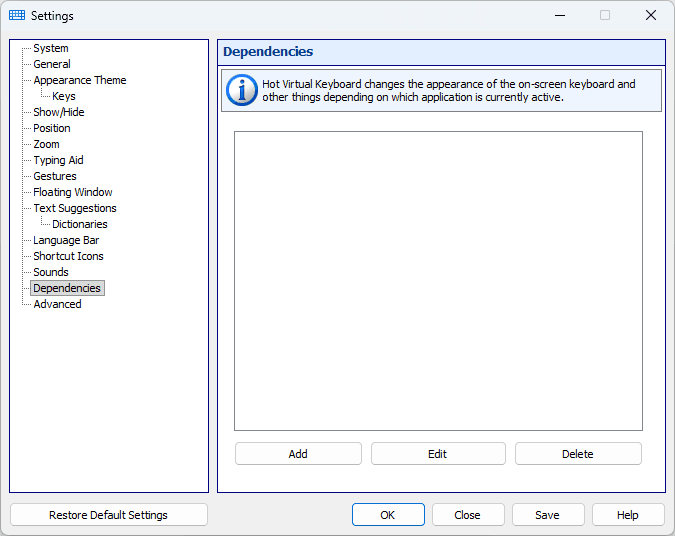
Hot Virtual Keyboard changes the appearance of the on-screen keyboard and other things depending on which application is currently active.
How it works
If you switch to a particular application, Hot Virtual Keyboard will change the specified settings.
When you switch back to the previous application, Hot Virtual Keyboard will restore the original settings.
Each setting in the list changes depending on the selected mode:
![]() - Don’t change the setting (use the setting defined in the Settings window)
- Don’t change the setting (use the setting defined in the Settings window)
![]() - Turn off the setting
- Turn off the setting
![]() - Turn on the setting
- Turn on the setting
In addition to the settings in the list, you can change the look of the on-screen keyboard and the set of hotkeys for a selected application.
Advanced
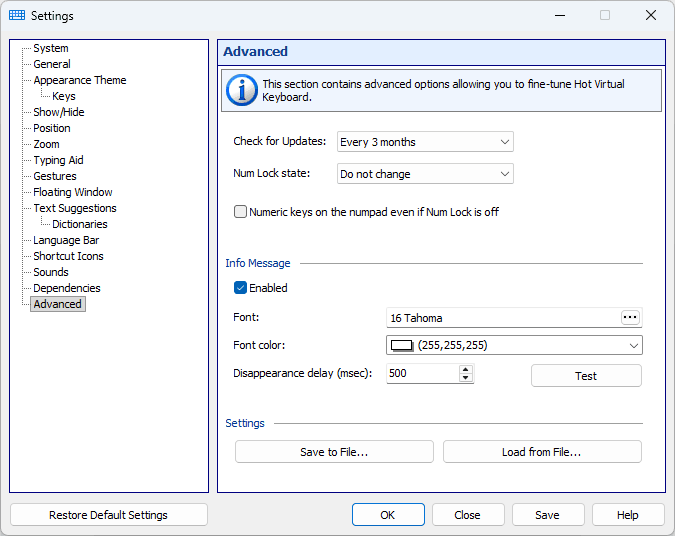
Check for Updates
Scheduled check for updates. To disable checking for updates, select the Disabled item.
Num Lock state
This option lets you keep or change the NumLock state when Hot Virtual Keyboard is started.
Numeric keys on the keypad even if Num Lock is off
This option may be handy if you work on a laptop and use both its keyboard and a standard keyboard connected to the laptop. If you turn NumLock on, some letter keys on the laptop keyboard will work as digital keys. If you turn NumLock off, you will be unable to use the NumPad keys on the standard keyboard to enter digits. By checking this checkbox, you can easily overcome the limitation imposed by the NumLock key.
Save to File...
Click this button to save all settings to the INI file.
Load from File...
Click this button to load all settings from the INI file. You can also load settings from the INI file by using the /RESTORE command line parameter.
Action types
To use Hot Virtual Keyboard more effectively, please familiarize yourself with the predefined action types.
You can assign a specific sound to each action.
If you assign a label for an action, this label will be displayed on the on-screen keyboard and in the hint instead of the action description.
Hot Virtual Keyboard actions
You can use this group of actions to configure shortcut keys for the Hot Virtual Keyboard features.
Close keyboard
Close the on-screen keyboard window.
Show the keyboard shortcuts settings window
Opens the keyboard shortcuts settings window. For more details, see the Keyboard shortcuts settings section.
Show or hide the on-screen keyboard
Shows or hides the on-screen keyboard. For more details, see the Using the on-screen keyboard section.
Activate the next keyboard type
Loads the next keyboard from the list of keyboards. To configure that list, click the Set the List of Keyboards button.
Show settings
Opens the application’s Settings window.
Text Suggestions on/off
Enables or disables the Text Suggestions feature. For more details, see the Text Suggestions section.
Replace key or shortcut
You can assign an action of this type to a key combination, though it is mostly used to replace a key combination with a single key.
Usage examples
- You can create keys on the on-screen keyboard for frequently used actions: Ctrl+C (Copy), Ctrl+V (Paste), Ctrl+Z (Undo), etc.
- You can remove function keys (F1, F2, etc.) from the on-screen keyboard, and use key combinations (Fn+1, Fn+2, etc.) instead.
- You can emulate a mouse click by pressing a key (for example, set the AltGr key as Right Button).
- You can turn your regular keyboard into a multimedia keyboard by configuring shortcut keys to behave as the keys unavailable on your keyboard: SEARCH, FAVORITES, HOME, NEXT_TRACK, PREV_TRACK, STOP, PLAY_PAUSE, etc.
Play a keystroke macro
A keystroke macro is a sequence of keystrokes or key combinations. Just specify once which keys should be pressed, and Hot Virtual Keyboard will duly repeat these keystrokes as many times as needed.
You can use the actions of this type to:
- Create keyboard shortcuts practically for any actions. One keyboard shortcut can replace the need to press several keys.
- Fill out forms.
- Enter your username and password.
- Quickly print a predefined number of document copies.
- And much more. If you frequently do the same routine operation, think about automating it. Keep in mind that practically any action can be done without using the mouse.
To start recording a macro, click the Record button.
To stop recording the macro, press the Pause key, or click the Record icon in the system tray.
When you are recording a macro, all your keyboard actions are saved to a table with the following fields:
- Delay before the next action.
- Event type – whether the key is pressed down or released.
- Key code.
- The sign that the key is an extended one.
You can edit a previously recorded macro, or create a new macro without recording it. To do it, click the Edit button.
Having recorded a macro, you can specify advanced parameters defining how it will be played:
- Play speed.
- The number of repetitions.
- The name of the process that should be activated before starting the macro. For example, you can make the window of Windows Media Player active before the macro is played. If Windows Media Player is not running at the moment, the macro will not be played.
You can stop playing the macro anytime. Just press the Pause or Esc key, or click the Playback icon in the system tray.
Paste text
You can use the Paste Text action to:
- Create a separate key on the on-screen keyboard for any character or text string, such as @ or “.com”.
- Quickly paste frequently used text fragments: greetings, cliches, email addresses, URLs, logins, and passwords.
- Quickly fill in web forms and registration dialog boxes.
- Type special characters that are difficult to enter using the regular keyboard.
Tips and tricks
- You can protect your data with strong 448-bit Blowfish encryption.
- All text is saved in the Unicode format, so you can use any characters.
- You can add various tags to the text. See how to use tags in the Text tags section.
- You can specify the position of the text cursor after the text is pasted by placing | (the pipe character) there.
Run a program; open a document or folder
You can use actions of this type to:
- Quickly start your favorite applications.
- Open frequently used folders and drives: My Documents, CD/DVD drive, etc.
- Open frequently used documents and network drives.
- Hide a file from your boss or kids, leaving access to it only via a keyboard shortcut.
- Clear your desktop from a pile of shortcuts, as now you can use the on-screen keyboard instead.
Program, folder or document Name
You can specify one or more programs in a separate line.
You can also run a program with additional parameters. For example: "C:\Program Files\Internet Explorer\iexplore.exe" -nohome
You can use <SELECTION> and <CLIPBOARD> tags for actions. For example: C:\voice.exe <SELECTION>
Start in folder
Enter the start-in folder for the program here. If you use the Add... button to find a program or document that you want to open with this action, the Start-in folder field will be filled automatically with the folder where the selected file is located.
Turn on the Switch to the already launched program option, and you will no longer need to check whether this program is already running or not.
Note: Select the Add to the Windows context menu check box in the Hot Virtual Keyboard settings, and you will be able to assign a shortcut key by right-clicking the shortcut of the program you are interested in and selecting the Assign Keyboard Shortcut item in the context menu.
Open one or several Internet resources
You can use actions of this type to:
- Open one or more websites that you visit every day (news, weather, forums, entertainment, etc.) with a single keystroke.
- Quickly open your favorite search engine: www.google.com, www.yahoo.com, etc.
- Create new email messages with the specified “To:” address. Just enter a string like mailto:support@google.com in the Open URL field.
- Quickly open the page of your corporate server.
You can use <SELECTION> and <CLIPBOARD> tags for actions. For example: https://translate.google.com/#fr/en/<SELECTION>
Connect/Disconnect from a network
Using this action type, you can easily set up a dial-up or ADSL connection.
After establishing a connection, you can close it anytime by pressing the same hotkey again.
Note: The connection must already exist in Windows (Network & Internet → VPN / Dial-up settings).
Audio control
You can configure shortcut keys for controlling the sound volume of the default device: turn it up, turn it down, mute, or unmute. Whenever you perform any of these actions, a slider (like that on a TV screen) will be displayed in the lower part of the screen.
Audio devices in Windows are the ones that you can use to play or record audio. This means that each time you listen to your favorite songs or talk into the microphone, you are using audio devices. When you listen to music (or any sound that comes from your computer), you are using the playback functionality that lets you hear the sounds in your speakers or headphones. An audio device can also record sounds coming from your microphone (for example, your voice) or from your computer (for example, the sounds produced by your playback device), thus providing the recording functionality.
Use these actions to change the default device: Change the default playback device and Change the default recording device.
Monitor control
You can configure shortcut keys for controlling your display: to turn your monitor on or off, to start a screen saver, or to open the Display Settings window.
Window control
You can specify keyboard shortcuts for any of the following actions:
- Minimize the active window
- Maximize/Restore the active window
- Close the active window or application
- Hide the active window or application
- Show the last hidden window
- Minimize the active window to the system tray
- Set the active window to be always on top (on/off)
- Terminate the active program
You can find the list of hidden windows in the context menu of Hot Virtual Keyboard. To show a hidden window, select its name in that list.
If you want some applications to keep running without being shown on the screen (for example, computer games), you can easily hide their windows.
Note: Some applications cannot be hidden because of their complex window structure. Instead of the window that you can see, only their service window is hidden.
Perform a system action
You can specify keyboard shortcuts for any of the following actions:
- Open the “Safely Remove Hardware” window
- Open Control Panel (Control Panel contains links to most of the tools used to configure various aspects of Windows)
- Open the “Date and Time” window
- Open the “Internet Properties” window
- Map network drive
- Disconnect network drive
- Empty recycle bin
Change the language or case
Using this group of actions, you can change the language, layout, or letter case of text.
You can specify keyboard shortcuts for any of the following actions:
- Change the input language or layout of the last typed characters
- Change the input language or layout of the selected text
- Switch the input language or layout
- Change language, layout or case
- Change the input language or layout to a specified one
- Change all the selected text to UPPER CASE
- Change all the selected text to lower case
- Change all the selected text to iNVERT cASE
- Change all the selected text to Sentence case.
- Capitalize Each Word of the selected text
- Use the specified input language or layout while holding down the key
- Change the input language or layout of the last typed word
- Change the input language or layout of the last two typed words
- Change the input language or layout of the last three typed words
Lock/Restart/Shutdown
You can specify keyboard shortcuts for any of the following actions:
- Lock this computer
- Log off
- Restart the computer
- Sleep
- Hibernate
- Shut down the computer
- Show the shut down dialog
Block key or shortcut
This action type allows you to block any key or key combination.
Usage examples
- You can block key combinations such as Alt+Tab, Alt+F4, Alt+Esc, Ctrl+Shift+Esc, Ctrl+Shift, etc.
- You can block the Left Win and Right Win keys in computer games running in full-screen mode.
- You can block any keys, such as CapsLock, Insert, or NumLock. At the same time, you can check the Enable combinations with other keys checkbox to be able to use the features of the blocked keys:
- Shift+CapsLock will be used instead of CapsLock.
- Shift+NumLock will be used instead of NumLock.
- Shift+Ins will paste text from the clipboard.
How to buy Hot Virtual Keyboard
Hot Virtual Keyboard is distributed as Shareware. If you like Hot Virtual Keyboard and decide to keep it, you will need to purchase a product key. The trial version becomes activated when you enter the product key on your computer.
You can purchase the product key on-line either by credit card, PayPal, bank transfer or check.
For more information, please visit https://hotvirtualkeyboard.com/buy/
For detailed information on how to purchase and activate Hot Virtual Keyboard, please read the following topics carefully:
Development
How to show, hide, move, or resize the on-screen keyboard
How to transfer the settings to another computer